Tampilkan postingan dengan label Chicken. Tampilkan semua postingan
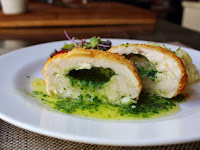
Chicken Kiev – A High Degree of Difficulty Always Scores Extra Points

Chicken Kiev – A High Degree of Difficulty Always Scores Extra Points

Unlike virtually every other recipe featured here, I’m not going to say this chicken Kiev is “easy to make.” It’s really not. You could follow this exactly as shown, and still have undercooked meat, or leaking butter, or any number of other tragedies. So, why try?

Because, if and when you pull this off, you’ll be enjoying one of the greatest chicken experiences of your life. It’s also one of the greatest garlic experiences of your life, as well as one of the greatest butter experiences of your life.

What makes this so challenging is that you can’t really cut, or poke into the Kiev to check for doneness. That would release the garlic-parsley butter prematurely, and be anticlimactic, to say the least. So, we go blindly by time. There are also variables like breast size, freezer temps/time, and oven crowding to deal with. 

However, if you use 8-oz breasts, and freeze exactly as shown here, then after a 2 to 3 minute deep-frying, these should take about 15-17 minutes to bake. The good news is that you have a few minutes after that before the meat gets noticeably drier, so you can give it a little extra time if it seems like it needs it.

One rule great of thumb is to listen for the butter. These are generally done when the garlic butter inside is hot enough to be forced out through the seams on the bottom, and when that happens you’ll hear a sizzle, and maybe see some butter leaking on to your pan. This is usually time to pull them out, and let them rest five minutes.

If you’re cooking more than four of these, make sure they are well spaced, and give them a few extra minutes. If I do these for a larger group, I always do a few extra, so I can cut into one and double-check. Don’t worry, it will be our secret.

Anyway, if you’re feeling brave, and want to enjoy something named after a place sort of near where they are holding the Winter Olympics, then I hope you give this amazing chicken Kiev recipe a try soon. Enjoy!


For 4 portions chicken Kiev:

For the butter:
2 cloves garlic, finely crushed
6 tablespoons unsalted butter
2 tbsp chopped Italian parsley (you can also add tarragon and/or chives)
pinch of salt

4 large (8-oz) boneless skinless chicken breasts
salt and pepper to taste

1 cup flour with 2 tsp salt mixed in
2 eggs, beaten
2 cups panko breadcrumbs
vegetable oil for frying, enough for 2-inches in a small pot
*Bake at 400 degrees F. for 15 minutes or until cooked through
That Other Meat Sauce

That Other Meat Sauce

We did a classic Italian bolognese sauce not too long ago, which reminded me that I’ve actually never posted a basic, Italian-American meat sauce. This sauce goes by many names, including Sunday sauce, since that’s the day it’s traditionally made, but for me growing up, this was just called “sauce.”

This is one of those primal recipes that always follows the same procedure, yet almost never contains exactly the same ingredients. I was raised on a blend of beef, pork, and chicken, but any and all leftover proteins can, and must, be added to the pot.

Meatballs are a great choice; as are things like pigs feet, neck bones, and other similar cuts. The tougher the meat, the better it’s going to be in this sauce. Besides playing meat roulette, I’ll also switch different herbs like basil in and out, as well as include the occasional season vegetable.

You can also vary your results here with different tomato products. I went old-school and hand-crushed whole plums, but you can also use crushed or pureed tomatoes as well. The finer and smoother the tomatoes are processed, the thicker your sauce will be, so keep that in mind. Speaking of tomatoes; yes, it is much better to caramelize the tomato paste with the onions before you add the San Marzanos, but I didn't because Grandma didn't, and also, I forgot. 

As long as you cook the meat long enough, and season thoughtfully, there’s really no way this sauce isn’t going to be great. So, while you may not have grown up in an Italian-American home, with this comforting sauce simmering on the stove every Sunday, your family still can. I hope you give this a try soon. Enjoy!


Ingredients for 6 portions:
2 tbsp olive oil, divided
1 beef shank
2 pounds pork ribs
2 bone-in chicken thighs
1 diced onion
6 cloves garlic
3 (28-oz) cans San Marzano plum tomatoes, crushed or blended smooth
(Note - any canned tomato product will work. Try with pureed or already crushed tomatoes and save a step)
1/4 cup tomato paste
2 cups water, more as needed
2 tsp salt, or to taste
1 tsp black pepper
1/4 tsp red pepper flakes
2 tbsp chopped Italian parsley
1/4 cup freshly grated Parmigiano-Reggiano
The Food Wishes' Chicken Wing Collection

The Food Wishes' Chicken Wing Collection

Just in case you haven't decided on a chicken wing for tomorrow's Super Bowl party, maybe this will help. Here, for the first time, we've pulled together every single Food Wishes' chicken wing recipe into one, convenient post. Enjoy!


Jerk Chicken Wings

In the spirit of full disclosure, these will be the wings I'll be enjoying for the game.

Garlic Parm Hot Wings

If casual dinning restuarants have taught us anything, it's that people love garlic-parm whatever.

Original Buffalo Chicken Wings

There's no way to prove this is the original recipe, which is a probably good thing.

Clifton Springs Chicken Wings

By far, our most popular and highest-rated chicken wing recipe.

Pastrami Chicken Wings

Sure, pastrami sandwiches are awesome, but they don't have any bones! Now, these on the other hand. 

Spicy Orange Chicken Wings

I can't say who I stole this spicy orange glaze from, but it rhymes with "Panda Express." 

Peanut Butter & Pepper Jelly Chicken Wings

This is no gimmick! Okay, it is, but it's an incredibly delicious gimmick.

Sweet and Hot Mustard-Glazed Chicken Wings

Hey, there's a reason honey-mustard is the second most popular chicken nugget sauce in the world.
Jerk Chicken Wings – Classic Jamaican Super Bowl Food

Jerk Chicken Wings – Classic Jamaican Super Bowl Food

I’m not sure why I hadn’t thought of this before, but what more perfect marinade and glaze for a Super Bowl hot wing than a Jamaican jerk sauce? These jerk chicken wings were so flavorful, so different, and so additively delicious, that I may have eaten my last Buffalo wing. 

Okay, I didn’t mean that, but these really are amazing; a perfect balance of sweet, sour, salty, and spicy. I'm usually pretty casual about you changing my recipes, but I’m going to have to insist you not change any of the key ingredients, which are, every one of them. 

I guess this could work with other hot peppers, but the fiery, super-fruity Habanero (or Scotch Bonnet if you can find it) is critical for achieving true magic here. You’ll find them in any decent market, and they are very expensive per pound, but they’re very light, so three or four certainly won’t break the bank.

I mention in the video to marinate at least 8 hours in the fridge, which is the preferred method, but if you’re in a hurry, like I was, you could just leave it out on the counter at room temperature for two hours instead. Keep it covered, and give it a stir every 15 minutes or so, but that will get you pretty close to the colder, slower refrigerator method.

So, if you’re looking for a little change of pace this year, why not take a break from those same old wings (sorry again, Buffalo), and give these tasty jerk wings a try instead? Enjoy!


Ingredients for about 24 Jerk Chicken Wing Drumettes:
3 lbs chicken wings
1/2 yellow onion, chopped
6 garlic peeled cloves
1/2 cup green onions, sliced
3 Habanero chili peppers, seeded, chopped
2 tablespoons freshly picked thyme leaves
1 tablespoon kosher salt
2 teaspoons black pepper
2 teaspoons ground allspice
1 tsp dried thyme
1/2 teaspoon cinnamon
1/2 teaspoon cumin
1/2 teaspoon freshly grated nutmeg
2 tablespoons vegetable oil
3 tablespoons soy sauce
2 tablespoon packed brown sugar
1/3 cup fresh lime juice, about 3 juicy limes

Blend all ingredients and marinate 8 to 12 hours in the fridge; or 2 hours at room temp.
- Bake 20 min at 450 F.
- Paint and turn, bake 15 minutes more
- Turn and paint, and bake 10-15 minutes more, or until well-browned and tender.
Chicken & Mushroom Chimichanga – A Thingamajig of Beauty

Chicken & Mushroom Chimichanga – A Thingamajig of Beauty

As legend has it, many years ago in Tucson, AZ, a woman accidentally dropped a burrito into a deep fryer. She started to blurt out a common Spanish swear word, but remembering her kids were in the kitchen, yelled out “chimichanga!” instead. She let it fry golden and crisp, and the rest is culinary history.

If you’re wondering, Chimichanga translates to “thingamajig,” which is fitting, since that’s kind of what this is. A thingamajig stuffed with whatever. In this case, whatever was a very tasty mixture of chicken, mushrooms, poblano chilies, and pepper Jack cheese.

While that particular combination is highly recommended, this is more of a technique video, so when it comes to the filling, I encourage wild experimentation. We used raw chicken here, but Chimichangas are also great for using up leftover, cooked meats. Just cube it up, toss it in when the vegetables are done, and proceed as shown.

And don't feel like you have to stay in the Tex-Mex zone. This versatile, folded and fried tortilla could make a fantastic delivery system for all kinds of ethnic foods. Anyway, no matter what kind of filling is used, or how it’s seasoned, I think everyone will agree that it’s never a good idea to curse in front of children. I hope you give this delicious son-of-a-gun a try soon. Enjoy!


Ingredients for 4 portions:
(exact measurements are not critical, as you can stuff these with anything that fits)

For the filling:
1 tbsp vegetable oil, divided (half for veggies, half to cook chicken)
1/2 cup diced onions
1/2 cup diced poblano peppers
1/2 cup sliced mushrooms
12 oz boneless skinless chicken breast meat, cut in 1/2-inch cubes
salt, freshly ground black pepper, cayenne pepper to taste
1/4 tsp cumin
1/4 tsp chipotle, smoked paprika, or other hot or mild ground chili pepper
pinch dried Mexican oregano
1 or 2 tbsp cold water to deglaze pan once chicken is browned
4 ounces grated pepper Jack cheese

Also:
4 large flour tortilla (at least 10-inch wide)
1 egg white
2 tbsp vegetable oil for pan-frying
sour cream, guacamole, and salsa to garnish, optional
Turkey Matzo Ball Soup – That Old Thanksgivingukkah Classic

Turkey Matzo Ball Soup – That Old Thanksgivingukkah Classic

Soup is always an obvious choice for leftover-turkey-themed videos, but it wasn’t until I heard about “Thanksgivingukkah,” that I knew that soup would be turkey matzo ball.

This year, Thanksgiving and the first day of Hanukkah fall on the same date for the first time since 1888, and this rare occurrence has been deemed, “Thanksgivingukkah.” And when we say rare, we mean rare, as this convergence will not happen again for another 77,000 years!

As I mention in the video, while pleased with my matzo ball skills, I’m not sure I’ve ever had the real thing (if that even exists), and so I don’t have anything to measure mine against. I’ve had it at delicatessens out here, but never in NYC, or other more legit locations. I’m using what seems to be a fairly standard formula, and they are quite light and tender, so until informed otherwise, I’m going assume these are pretty good.

However, there is one thing I would love to know. Why do “we” boil the matzo balls in salted water, instead of the soup? I’ve heard it’s so the broth doesn’t get cloudy, but is that really all there is to it? Speaking of the broth, yours will undoubtedly be superior to mine. By the time I got to this video, I only had a few scrawny pounds of meat and bones left, and yet it still came out wonderfully flavorful.

If you use all the scraps from a decent sized bird, you should get an incredibly rich broth, which is exactly what you want to be ladling over your matzo balls. As far as extra ingredients go, I like a minimalist approach with this soup, but of course, feel free to embellish your stockpot with whatever you see fit.

Some of this will be determined by how you season your Thanksgiving bird, and I can personally verify that this year’s Peruvian version worked nicely. So, I hope you enjoy the coming Thanksgivingukkah, and here’s hoping the end of your turkey means the beginning of a delicious matzo ball soup. Enjoy!


Ingredients for 4 portions (I only served one matzo ball, but this will make enough soup for 4 portions with 2 matzo balls per serving):

For the turkey broth:
3-4 pounds of roasted turkey bones and meat scraps (use everything you have, the fattier the pieces the better)
at least 2 quarts water or chicken broth, or enough to cover
1 large onion, chopped
2 ribs celery
- simmer on low for 3 hours or until all the meat falls off the bones and it’s flavorless.
- skim and reserve at least 4 tbsp of the melted fat that rises to the top
- strain, and you should have about 6 cups of broth. If you have more, reduce down to 6 cups (do not season with salt until reduced). If you didn’t get quite 6 cups, just add some chicken broth to make up the difference.

Note: my turkey was already very well seasoned, so I didn’t need to add much to the stockpot. You can adjust your broth according, and can certainly add things like bay leaf, thyme springs, parsley stems, etc.

For the matzo balls (makes 8):
2 large beaten eggs
2 tbsp rendered melted turkey fat
1 tsp fine salt
1/4 tsp freshly ground black pepper
pinch of cayenne
2 tbsp seltzer or club soda
1/2 cup matzo meal
- Mix and chill 30 minutes at least
- Boil in salted water (1 1/2 quarts water with 1 1/2 tablespoons salt) for 30 minutes and serve with turkey broth

For the soup:
2 tbsp rendered melted turkey fat
1 cup diced onion
1/2 cup diced carrot
1/2 cup diced celery
1 garlic clove, thinly sliced
6 cups very rich turkey or chicken broth (see recipe above)
salt and pepper to taste
1 tbsp chopped parsley
1 tbsp chopped dill
8 cooked matzo balls!
Salt-Roasted Chicken – Tastes Like Chicken

Salt-Roasted Chicken – Tastes Like Chicken

There's no mystery why “Chicken” is one of the most popular recipe searches ever. Everyone loves chicken, but it’s easy to get tired of, so we're always on the lookout for new things to try. 

The problem is we get so tied up in adding things, that we forget how amazing roast chicken can be when we take things away…like everything, except a very generous dusting of kosher salt. 

When you prep a chicken like this, and roast it in a very hot oven, the bird has no choice but to cook and crisp up in its own juices, which results in very moist, flavorful meat. Thomas Keller, who helped popularize this minimalist method, argues that cooking the thighs/legs as quickly as possible in a very hot oven prevents the breasts from drying out, and I tend to agree. 

Of course, no matter how juicy and chickeny your chicken tastes, it can only get better garnished with a little spoonful of thyme butter sauce. I wanted to remind everyone how simple it is to make these quick, butter-based pan sauces. If you know how to make one, you know how to make a thousand. 

The important thing to remember is that any time there’s a pan sitting around crusted with caramelized meat drippings, you’re always only three minutes away from a world-class sauce. I hope you give this a try soon. Enjoy!


Ingredients for four portions:
1 big chicken, about 3 1/2 to 4 pounds
lots of kosher salt (coat the entire surface of the bird, inside and out, with the salt, being extra generous on the breasts)
– Roast at 450 F. for 50-60 minutes
For the sauce:
1 tbsp thyme leaves
1 lemon, juiced
1/3 cup chicken broth (plus all extra juices from rested chicken plate)
2 tbsp cold butter cut in 4 pieces
salt and pepper to taste
cayenne, to taste
(Note: I’m totally guessing at measurements here, since you kind of just splash stuff in. Use the force.)